
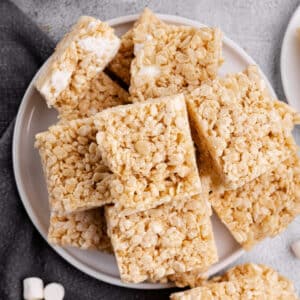
These brown butter rice crispy treats are irresistibly soft and chewy, with a rich, caramel-y flavor from the browned butter. Big, pillowy chunks of marshmallows are tucked inside so every bite is melt-in-your-mouth delicious.

I never was a fan of packaged rice crispy treats growing up. They weren’t bad, just kind of meh, sweet but flat, missing that something special that makes a treat worth craving.
But homemade rice crispy treats are pure magic - especially when you make them with rich, caramelized brown butter! Big chunks of marshmallows doesn't hurt either. 🙂
These browned butter rice krispie treats, dare I say it, may even rival your favorite cookie! But don't take my word for it, try them and see!
(Psst ... chocolate lovers, try my chocolate chip rice krispie treats!)
Key Ingredients

- Unsalted butter - I buy my butter in bulk at Costco so I never run out. Butter freezes well for about 6 months though I go through it quickly. You can make delicious rice cereal treats with coconut oil too!
- Mini marshmallows - For the sweet, sticky mixture that holds the rice cereal together. Mini marshmallows melt quickly and evenly.
- Regular marshmallows - I couldn't resist throwing some big marshmallows in toward the end so you get a big hunk of pillowy marshmallow in every bite! One might call it a genius move. 😉
- Rice cereal - You don't have to use rice krispies, BUT you do want to find a brand that has the same taste and texture as rice krispies. They should be light, small, and crisp. I used a generic brand with great results.

How to Make Brown Butter Rice Krispie Treats
Not only are they delicious, but homemade crispy treats are shockingly easy!
Before you start, you want to prepare your baking dish. Spray it or grease it, then place a piece of parchment paper inside and let it drape over the sides, like the picture below.

Doing this gives you nice little handles so removing the treats is a breeze!
- Brown the butter - Don't be intimidated! Browning butter is easy! Just let the butter melt, sizzle, and brown over medium heat. Don't crank up the heat! You will begin to see the milk solids brown on the bottom of the pot and the liquified butter turn an amber color.


- Add the mini marshmallows and stir until melted and emulsified with the butter.
- Add the rice cereal to the pot and stir quickly until evenly coated. Remove the pan from the heat then immediately add the cut marshmallows. Stir to disperse them throughout the rice crispies.


- Dump the mixture into the prepared pan and spread it around with a spatula. I like to use a piece of parchment paper to press the mixture (not too hard!) evenly into the pan.


- Let the bars cool for at least an hour before you remove them from the pan and cut them into squares.


Tips & Tricks
- Don't crank up the heat! You want to brown the butter AND melt the marshmallows slowly. If the heat is too high, the mixture will get hard when it solidifies instead of tasting gooey! It should be set to medium or medium-low, NOT medium-high.
- Gently press the sticky mixture into the baking dish. The harder you press them into the pan, the more firm they will be. For a uniform treat, press them evenly but gently without too much pressure.
- Always line the baking dish with parchment. It makes removal from the pan so easy and straightforward. Just use the "handles" to lift the entire bar out.
- Always use fresh marshmallows. This does matter! Don't search the back crevices of your pantry for a half opened bag of stale marshmallows.

Storage
- Don't store rice krispie treats in the fridge. They will harden and lose their buttery, gooey texture.
- Store the treats in an airtight container at room temperature for up to 4 days.
Can you make cereal treats gluten-free?
Absolutely! The secret to making gluten-free Rice Krispie treats is choosing a gluten-free rice cereal. Despite what many people think, traditional Rice Krispies aren’t gluten-free because they contain malt. Many generic or off-brand cereals may not include gluten ingredients, but aren’t officially certified gluten-free. The choice is up to you! If you are sensitive to cross contamination, look for a certified brand.
More Cereal Treat Recipes
- Chocolate Protein Rice Crispy Treats
- Rice Krispie Treats with Marshmallow Fluff
- Peppermint Bark Rice Krispie Treats
Brown Butter Rice Crispy Treats
Equipment
- 9x13-inch glass baking dish
Ingredients
- 10 tablespoons unsalted butter
- 8 cups mini marshmallows
- 8 cups rice cereal see note for gluten-free
- 20 regular marshmallows cut in half
Instructions
- Spray a 9-by-13-inch baking dish with nonstick cooking spray. Line with parchment paper, pressing it in so it sticks to the pan, allowing the edges to drape over the sides of the dish. Spray the parchment paper with nonstick cooking spray.
- In a dutch oven or heavy bottomed pot over medium heat, add the butter. Let the butter melt, then pop and sizzle. Watch the butter, stirring occasionally, until the milk solids brown and the butter turns a deep golden brown.
- Add the mini marshmallows to the butter and stir until completely melted and emulsified with the butter. Turn off the heat.
- Add the rice cereal to the marshmallow mixture and stir until combined. Remove the pan from the heat, then add the cut marshmallows and stir until evenly dispersed.
- Dump the mixture into the prepared pan. Use the spatula to move it around evenly, then use a piece of parchment paper to evenly press it into the pan.
- Let the mixture cool for at least an hour before cutting into squares.

Leave a Reply